Showing posts with label recipes. Show all posts

Friday, August 7, 2009

This weekend calls for...Sangria!

{image courtesy of ibiza hotels}


Well actually probably not this weekend as I already have festivities planned that include champagne and margaritas for Julie's going away party. She's leaving us to head waaaaay across the state and start law school in a few weeks. Hopefully she'll be working here in the summers! But maybe your weekend plans call for sangria???

I made this sangria recipe a few weeks ago when my friend Lauren came to town for a girly weekend and to see The Fray in concert. I feel like I always see tons of sangria recipes, everyone seems to have one that they swear by, or one that is just SO easy. I've made a few and they always just seemed to be missing something. I ran across this recipe in a free neighborhood magazine that I ususally just toss in the recylcing bin but the promise of "cool summer cocktails" on the cover caught my eye this time.

As I read the recipe I saw one ingredient - that proves to be key - that I'd never seen in a sangria recipe before: frozen lemonade concentrate. My curiosity was peaked! (Plus I've been on the lookout for fun punch recipes ever since I finally gave in and bought one of those cool glass beverage jars...so this was just another excuse to use it.)

Luckily the meal I'd planned for that night would complement the sangria well so it seemed like the thing to do.

Sangria!

1/2 cup brandy
1/2 cup triple sec
1/4 cup lemon juice
1/3 cup frozen lemonade concentrate
1 (750 milliliter) bottle dry red wine
1 lemon, sliced into rounds
1 orange, sliced into rounds
1 lime, sliced into rounds
1/4 cup white sugar

8 maraschino cherries (optional)

There really aren't any 'directions' for this - you just mix it all up and enjoy! They did suggest you mix it the night before for best results but I did ours right before we drank it and Molly, Lauren and I thought it was pretty tasty!

I made a double batch of this and we used Yellow Tail Shiraz as the red wine - it was fantastic! I was a little leery of the brandy taste but it really worked out and the frozen lemonade concentrate gave it this little extra zing that I feel like is usually missing from my other recipes. It was refreshing and light instead of sickly sweet, which is how I feel about some others.


For dinner that night we had Cumin Dusted Chicken Breasts with Guacamole Sauce from Cooking Light. YUM! This was so easy and I highly recommend it with sweet potato fries. (the frozen ones are actually really good!)

Hope everyone has a fast Friday and a great weekend!

Wednesday, July 29, 2009

Cupcakes and a Movie Sunday


I was so excited when my grandmother gave me the new Martha Stewart Cupcakes book a few weeks ago. As soon as I started perusing the glossy pages, I was dying to make several of the recipes. Have you seen this book? It is GORGEOUS! Seriously – if you like cupcakes, you should buy this book. It would also be a great gift!

For my first endeavor, I decided to make the Mint Filled Brownie Cupcakes. I invited my mom over to help and watch a movie and let me say it was MUCH easier and much more fun to make cupcakes with someone than by myself. This way we were both cleaning and splitting up the steps, it was actually pretty relaxing!

So we’ve done this “cupcakes and a movie” thing on a Sunday twice now. Might be a nice little tradition to start!

As I said, our first go round was with the Mint Filled Brownie Cupcakes. I am a sucker for anything with mint and this recipe only makes 12 cupcakes so it seemed like a safe place to start. The recipe was easy to follow and the cupcakes were great! I do think we cooked them a tad too long though so be sure to watch yours starting at about 25 minutes if you try these at home. The peppermint patty candy ended up being kind of hard and chewy instead of soft, as in the pictures in the book.

Mint Filled Brownie Cupcakes - Martha Stewart Cupcakes
Yield: 12 cupcakes

8 oz. semisweet or bittersweet chocolate, coarsely chopped
½ cup unsalted butter, at room temperature
1 cup sugar
¾ tsp salt
3 large eggs
½ cup all purpose flour
¼ cup unsweetened Dutch process cocoa powder (I used regular Hershey's)
12 small chocolate covered peppermint patties, such as York

Preheat the oven to 350 degrees. Line a standard muffin pan with paper liners. Place chocolate and butter in a heat proof bowl set over a pan of simmering water. Stir occasionally until just melted, 4 to 5 minutes.

Remove from the heat. Whisk in the sugar and salt until mixture is smooth, whisk in eggs to combine. Gently whisk in flour and cocoa just until smooth.

Spoon 1 heaping tablespoon of batter into each lined cup. Place 1 peppermint patty on top, gently pressing into batter. Top with two tablespoons batter, covering patty completely. Bake, rotating tin halfway through, until a cake tester inserted halfway into centers (above mint patty) comes out with only a few moist crumbs attached, about 35 minutes. Transfer tin to a wire rack to cool completely before removing cupcakes.

The movie that accompanied the Mint Filled Brownie Cupcakes was “Last Chance Harvey”. It was alright. Good for something to have on in the background but not really something I’d want to watch over and over.

This past Sunday we had “Cupcakes and a Movie”, Round 2. This time it was Martha’s Peanut Butter Cookie Cupcakes and “27 Dresses”. We were going to watch “Confessions of a Shopaholic” but once we saw all the steps involved in these cupcakes, we thought it might be better to just have something on that we’d seen several times before.
As it turns out, the cupcakes were not that labor intensive. It was just the time spent waiting for them to cool and then frosting that took awhile but we just watched the movie during that time anyway. Really though, there is nothing to be intimidated about here, it was actually pretty easy and the end result is fantastic!

I love how the frosting looks like real peanut butter cookies!

Peanut Butter Cookie Cupcakes – Martha Stewart Cupcakes
Yeild: about 2 1/2 dozen (I only got about 2 dozen when I made them)

Cupcakes:
1¾ cups all-purpose flour
¾ tsp baking powder
½ tsp salt
¼ tsp baking soda
¾ cup (1½ sticks) unsalted butter, softened
1 1/3 cups granulated sugar
2/3 cup natural, creamy peanut butter (I used Peter Pan)
3 large eggs
½ tsp pure vanilla extract
½ cup sour cream (I used light)

Frosting:
12 ounces cream cheese, at room temperature (I used 1/3 less fat)
1½ cups powdered sugar, plus more for decorating
3 Tbs unsalted butter, softened
1½ cups creamy peanut butter (I used Peter Pan)

1. Preheat oven to 375°F. Line 3 standard 12-cup muffin tins with paper liners.

2. Prepare cupcakes: Whisk flour, baking powder, salt, and baking soda in a medium bowl. Put butter and sugar into bowl of an electric mixer fitted with the paddle attachment (or use a regular mixer). Mix on medium speed until pale and fluffy. Reduce speed to low. Mix in peanut butter. Mix in eggs, 1 at a time, and vanilla. Add flour mixture; mix until combined. Mix in sour cream.

3. Spoon scant 3 Tablespoons of batter into each muffin cup. Bake until pale golden and a toothpick inserted into centers comes out clean, about 13 minutes. Transfer to wire racks; let cool completely.

4. Prepare frosting: Put cream cheese, powdered sugar, and butter into the clean bowl of a mixer fitted with the clean paddle attachment; mix on medium-high speed until pale and fluffy. Stir in peanut butter with a rubber spatula.

5. Spread 1½ Tablespoons frosting onto each cupcake. Refrigerate until frosting is firm, about 10 minutes. Using tines of a fork dipped in powdered sugar, score each top in a crosshatch pattern.
6. Cupcakes can be refrigerated in single layers in airtight containers up to 2 days.

These are good but they are RICH. I’ve still got several of these cupcakes left, even after taking some to work (this is when I wish my office had more people!), and I do have to fit into a bridesmaids dress in October so this "Cupcakes and a Movie" may not be an EVERY week occurrence but maybe every other week…there are lots more recipes I’d like to try!

Thursday, July 16, 2009

Housewarming Pics and Recipes!

As promised here are pictures and recipes from the housewarming party I had several weeks ago. I can’t believe it has taken me this long to get this together but better late than never I suppose! All of the recipes were a huge hit – especially the Mango Chevre Steak bites, I think we only had one or two left at the end of the night!

The dining room all ready to go before the food was put out...

Menu:

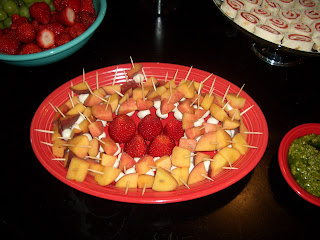
Mozzarella and Nectarine Skewers with Pesto
I wasn't really sure how these were going to turn out but I was so intrigued by the combination that I just had to try them. I wasn't able to find the right size skewers so I ended up using toothpicks instead and bought the mozzarella balls in 'pearl size' - they were perfect. I just put one piece of cheese and one piece of peach on each toothpick and then had a side dish of pesto for people to drizzle over their skewers. The taste was so light, summery, and refreshing!


Kahlua Pecan Brie
This is a recipe that my friend Angie has been making for years. Her best friend's mom wrote a cookbook, Confessions of a Kitchen Diva, that includes this recipe plus tons of other great food for any occasion. This recipe is always a crowd pleaser.

1 14 oz Brie round
1/4 cup Kahlua
3/4 cup chopped pecans
3 Tablespoons brown sugar

Scrape white coating off brie. Place brie in oven safe pie plate.
In a small bowl, mix kahlua, pecans and brown sugar until sugar is dissolved.
Pour kahlua mixture over Brie and bake at 350 for 10 minutes or until Brie begins to ooze.

(I like to let mine go about 12 minutes so its really soft and gooey!)

Serve with Carr's Water Crackers.


YUM!


I guess the brie was still in the oven when I took this picture but it was all set to go right behind that blue plate of crackers with grapes in the middle!

Next up.....

I first saw this recipe on one of my favorite blogs, Elizabeth's Edible Experience. She is always cooking up something wonderful and I love seeing her step by step pictures and reading her extra tips and tricks. Seeing the pictures makes it all seem easier to me and really makes me want to cook!

(I'm sorry I didn't take close up pictures of everything - I guess I was too busy playing hostess! Head over to Elizabeth's blog to see step by step pictures of the process and the finished product!)

Hot Artichoke Dip
I'm not exactly sure where this recipe came from but my family has been making it for years. For some reason it always seems to appear as an appetizer on Christmas Eve but its so easy that I make it all the time.

1 can of artichoke hearts, drained
1 cup Parmesan cheese (the kind in the can)
1 cup mayonnaise
1 tsp lemon juice
¼ tsp garlic powder

Blend all ingredients in food processor or blender until smooth. Spread evenly into greased pie plate and bake at 350 for 30 to 45 minutes or until edges are golden brown.

Serve with wheat thins or as a dip for vegetables.


The artichoke dip is pitctured in the square turquoise dish on the far right...the crab dip is in the other turquoise dish, a little to the left.


Crabmeat Dip

This recipe is from Southern Living but unfortunately its from one of their special holiday books and the recipe isn't available online. But luckily my friend Heather, sent me a copy via email. We made this a few years ago at Heather's house on one of our cooking club nights and all loved it. Since then I have made it a few times but usually reserve it for special occasions as it is a bit time consuming. Also, the original recipe suggests that you reserve one cup of the dip before baking and use it to stuff chicken breasts. We did this the first time we made the recipe and it was great!

Crabmeat Dip
From Southern Living
(can make a day ahead and then bake when ready to eat)
1 (8 oz) package 1/3 less fat cream cheese
1 (5.2 oz) package boursin* buttery garlic & herb spreadable cheese
1/2 cup mayo (can use low fat)
1/4 cup finely chopped red bell pepper
1/4 cup chopped green onions
3/4 cup freshly grated parmesan cheese
1 tsp dijon mustard
1/2 tsp worchestershire sauce
1 tsp hot sauce (Tabasco)
2 tbsp fresh lemon juice
1 garlic clove, minced
2 tbsp capers
1/4 tsp freshly ground black pepper
1 lb fresh lump crabmeat, drained

Combined all ingredients (except crab), stirring well.

Gently fold in crabmeat.

Spoon dip into a lightly greased 8" square baking dish.

Bake at 350 for 30 minutes or until bubbly.

Serve with crackers. Yeild: 4.5 cups

*A few tips - If you can't find the Boursin cheese, you could use Rondele or Alouette. Boursin is the highest in fat among these and the most expensive (at least at my store). Also, when I made this for the party, I used fake crab for the first time and it came out great. So if you don't have the time to sift through the real thing for pieces of shell or don't want to 'shell out' the money for genuine lump crabmeat, the fake will work just fine. There are so many other flavors in this dip that you can't even tell.*


When I made these I really simplified the recipe and just used smoked salmon and 1/3 less fat cream cheese for the filling. I think I probably added a little salt and pepper also but I kept it all pretty easy so that the salmon flavor would be most prominent. These are pictured on the little stand in the picture above. As you can see, we made quite a few of these!


And now on to dessert!

I wanted everything to be easy to just grab and eat so these desserts were perfect.

For the chocolate lovers...
Oreo Truffles

And for the vanilla lovers...
Cake Balls

I believe Bakerella is really where this cake ball/cake pop craze came from. The recipe link above is for some red velvet ones with chocolate coating but you can sub in any flavor of cake mix, frosting and coating to make your own combo. For the party I used yellow cake with vanilla frosting and white coating. They were fantastic!

It was so much fun having everyone over and having a reason to make all this 'party food'!

Thursday, April 30, 2009

Weekend Update and Cinco de Mayo Recipes!

Once again, I’ve been absent from the blog for awhile (minus the DWTS post yesterday – I am still so sad that Chuck is gone!) and once again its for a very good reason! I am finally all moved into the house and had my first houseguest over the weekend so I spent all of last week getting things ready for company! I had one friend coming in on Thursday night and another on Friday so Mon – Wed was major crunch time! Usually I am in bed on a ‘work night’ by 11 pm at the latest but last week it was all 1 am or later for me. I was cleaning, decorating, unpacking, organizing – everything! I am very pleased with the way things turned out though and glad to have that process behind me so that now I can enjoy everything and not continue working when I get home at the end of the day.

(I was going to wait to post this until I had taken some more house pictures but thought you all might want the recipes (since they were all mexican food) if you were planning on anything for Cinco de Mayo –I will post house pics in a separate post next week!)

My friend Tiffany was in town last week from Austin for work and came by on Thursday. We got to catch up over a bottle of wine and some Texas Caviar – a recipe I got from the Four Fat Chicks. Its not often that I get to see my girlfriends when we have the time to just sit and talk without some other ‘event’ going on so it was so great to spend so much time just chatting and hanging out. I miss the times in college when that’s pretty much all we did! Its sad that we’re all so busy these days!

Here’s the recipe for the yummy Texas Caviar that we had for ‘dinner’!

Texas Caviar
(makes a LOT)

1 can corn (drained)
1 can pinto beans (drained)
1 can black beans (drained)
1 can Ro-tel (I don’t drain this very much)
½ cup chopped green bell pepper
1 clove garlic (minced)
1 16 oz bottle fat free Italian dressing

Mix and serve!

Some recipes call for more Italian dressing so feel free if that’s the taste you’re after!

I find this to be especially yummy with Tostitos Baked Scoops and that it is better once it has had some time to chill in the refrigerator……

On Friday my friend Meredith came in town from San Antonio to stay for the weekend. I lived with Meredith in college along with another girl, Molly, who also lives here so she came over for dinner on Friday as well. It had been a long time since the three of us got to catch up together!

Meredith is not a fan of fruit (crazy, right???) but Molly and I enjoyed some pomegranate margaritas before dinner.

Photo Courtesy of The Food Network


Pomegranate Margaritas
(serves 2)

¼ cup lime juice
2 shots POM Wonderful juice
½ cup tequila
¼ cup triple sec

Serve over ice with a squeeze of lime.

And for dinner we had Chicken Tamale Casserole from Cooking Light. I first saw this recipe on Elizabeth’s Edible Experience and had made it once before. I made this using her advice on the recipe to leave out the creamed corn in favor of just regular corn and it works great. I read some reviews online and some people complain about the ‘too sweet’ taste but I think this must be cured by the normal corn because this does not seem too sweet to me. Also, some people have used green enchilada sauce instead of red and really liked it so use whatever you prefer!


Head over to Elizabeth's blog if you would like to see step by step pictures - you'll also find lots of other yummy recipes over there!


Photo courtesy of Cooking Light


Chicken Tamale Casserole
Cooking Light November 2008

1 cup (4 ounces) preshredded 4-cheese Mexican blend cheese ( I used reduced fat 2% blend)
1/3 cup fat-free milk
1/4 cup egg substitute
1 teaspoon ground cumin
1/8 teaspoon ground red pepper
1 (14 3/4-ounce) can cream-style corn ( I used regular corn - I hate cream corn)
1 (8.5-ounce) box corn muffin mix (I used Jiffy)
1 (4-ounce) can chopped green chiles, drained
Cooking spray
1 (10-ounce) can red enchilada sauce (such as Old El Paso)
2 cups shredded cooked chicken breast (I used a rotisserie chicken and used more than 2 cups…) 1/2 cup fat-free sour cream (optional topping)

Preparation
1. Preheat oven to 400°.

2. Combine 1/4 cup cheese and next 7 ingredients (through chiles) in a large bowl, stirring just until moist. Pour mixture into a 13 x 9–inch baking dish coated with cooking spray.

3. Bake at 400° for 15 minutes or until set. (I had to cook mine about 20-22 min) Pierce entire surface liberally with a fork; pour enchilada sauce over top. Top with chicken (When I made this recipe the 2nd time I poured some sauce over the bread, just to coat it and then mixed the remaining sauce and the chicken together in a separate bowl and then placed that mixture on top of the bread);sprinkle with remaining 3/4 cup cheese.

4. Bake at 400° for 15 minutes or until cheese melts. Remove from oven; let stand 5 minutes.
Cut into 8 pieces and serve. YUM!

Our plan for the rest of the night was to watch the Sex and the City movie because Meredith had only seen it once – can you imagine? – but of course we ended up talking with the movie on in the background. We had a great night full of girl talk!

Saturday I proved to my hard core workout friend Meredith that walking really is a workout! I knew she thought I was crazy and even wore her heart rate monitor to see if she was getting a good workout – I was actually a little worried at what the official stats would be but luckily the walking workout got a good rating! We walked about 4.5 miles in just over an hour so we were moving!

That night we met some friends for sushi had a great time catching up and having some great food. That was pretty much the end of our girly fun-filled weekend. After Meredith left on Sunday I caught up on a LOT of tv (I am loving having my DVR back!) and ran some miscellaneous errands. This week has actually been pretty nice thus far and I’ve been able to work out and just relax in the evenings now that most of the house stuff is out of the way. I’m so glad I got a lot of that done last week so that now I can just enjoy it!

I tried a new Jillian Michaels workout dvd this week that I’ve had on Netflix for about a month now, “Banish Fat Boost Metabolism” – it’s a good one! I’ll post a review after I’ve completed it a few more times, so far I would recommend it though!

Tonight we’ve got our book club meeting for “Straight Up and Dirty” by Stephanie Klein – I’m looking forward to a fun night, and then the weekend is almost here!

Tuesday, April 14, 2009

Lemonade Cake

I’m sorry I didn’t post this over the weekend but this is a great spring/summer dessert that everyone will love! Its also very easy...

Recipe:
1 box lemon cake mix
1 cup frozen lemonade concentrate, thawed
1 cup powdered sugar
1 container lemon frosting

Preheat oven to 350.

Prepare and bake cake as directed on package in greased 13 x 9 pan. Let cool 15 minutes.

Stir together thawed lemonade concentrate and powdered sugar. Poke holes on warm cake with fork. Drizzle lemonade mixture evenly over cake. Refrigerate cake until cold.

Spread frosting over cold cake and serve.

Cover and refrigerate leftover cake.


Ingredients: Yes, that is sprite and vanilla ice cream!

Prepare the cake according to package directions BUT I learned this little trick from my friend Heather who took a cake decorating class - use sprite in place of water and once everything is mixed, add in a scoop of softened vanilla ice cream and mix into the batter just before baking. It makes a very good cake! And you can do this with ANY cake flavor!


Bake the cake according to package directions - looks good to me!


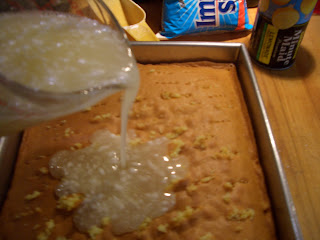
While the cake is cooling, mix one cup of thawed lemonade concentrate and 1 cup powdered sugar.


Use a fork to poke holes in the cake while it is still warm.


Pour the lemonade/powdered sugar mixture evenly over the cake.

Then refrigerate until cake is cool. I prefer to do this overnight if possible but it will be cool after 3-4 hours.


Once the cake has fully chilled, spread lemon icing over the top and serve!

Unfortunatley this is not type of cake you can take out of the baking pan and put onto some cute serving dish. It must be served directly from the pan. Makes the whole thing pretty easy!

Enjoy!

Wednesday, February 11, 2009

Valentine's Day!

With Valentine's Day looming over us and my love for champagne very apparent, I thought I'd share a few easy desserts that will go with any bottle of bubbly you choose!

One that may sound kind of odd but I promise is especially good involves the following ingredients:


Just clean and cut the tops off the strawberries and using a fork, dip one side lightly into the sour cream and then into the brown sugar and Y-U-M! I know it sounds weird, sour cream and brown sugar...but I promise its really good! And tastes fantastic with champagne! I don't know anyone who has ever tried this and NOT liked it, give it a try this Valentine's Day! (It also comes off seeming like you are a real 'foodie' and into the weird combos, maybe you could impress your sweetie with this interesting dessert!)

I even managed to find a picture of this online so I know I'm not the only one who likes this!

My other super easy dessert is a chocolate raspberry brownie fondue. This recipe is adapted from the Betty Crocker website. I have taken this to numerous watchings of The Bachelor, book club meetings, even Superbowl parties and it never disappoints!

For this recipe you will need:


Bake the brownies according to the package directions. Let cool and cut into 1 inch squares. (Don't forget to use a plastic knife to cut your brownies - it makes a much cleaner cut!) If you have one of those fondue bowls with a tealight underneath (I think you can get them for about $10 at Crate and Barrel...) you can use it for this to keep the mixture warm or just any normal bowl will do you just may have to heat it up again from time to time. For the icing to preserves ratio I use about 3 parts icing to 1 part preserves. I usually start with about 1/3 to 1/2 the container of icing and then add a few spoonfuls of preserves - or peanut butter, its pretty good with the chocolate also! Stir this up in a bowl and then heat in the microwave for about 30 seconds. Then let the dipping begin!

For a little variety, you can add some berries, marshmallows, or maybe pretzels to dip also!

Most importantly, don't forget the bubbly.......

Happy Valentine's Day!